
So what do you need?

WHAT YOU'LL NEED:
1. Chocolate Bar (or really any other palette if you just follow the premise of the walkthrough)
2. Gel black eyeliner
3. Eye primer-- Mary Kay has a good one and so do Benefit and Too Faced
4. Mascara
5. Highlighter pencil-- I use the Chella milk colored one.
6. Colored pencil eyeliner-- in this case, purple. I used a covergirl one.
7. Bare Minerals 5-in-1 creme shadow
8. Eyelash curler
9. Lip brush
10. Spongey shadow applicator
11. Angled brush
12. Blending Brush-- I like the dual ended one from August's Ipsy.
STEP 1: Okay, so here we are. Face is done, contoured, everything. Brows done, eyelids primed.

STEP 2: Time to highlight. You take your highlighter pencil and use it to sharpen the line of your brows, which will in turn highlight your brow bone and give you a mini-face lift.


STEP 3: Blend out that highlighter.

STEP 4: Take your 5-in-1 creme shadow (a color about the shade of your natural tone) and paint it over your lid with the applicator. Then blend it in with your finger to give you a seamless transition from shading to highlighting.


So now we should look like this. Trust me, the mini face lift makes all the difference some days.

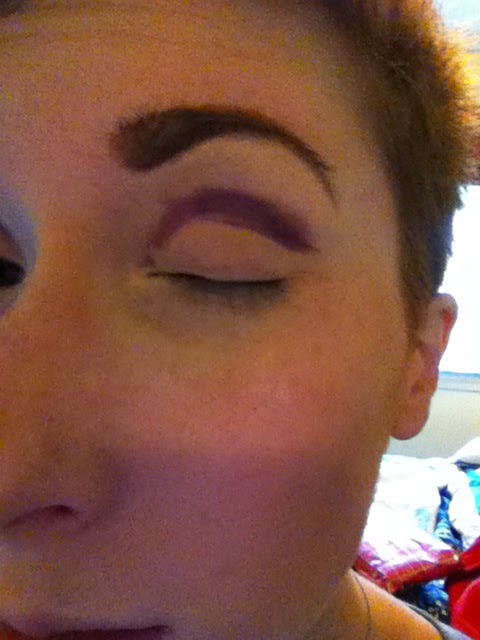
STEP 5: Take your colored eyeliner, mine is a warm plum, and you are going to draw your arch slightly above the ridge of your crease. Blend it out towards the tails of your eyebrows to already start forming the cat-eye shape.


STEP 6: Blend! It's not going to feather out as softly as you want it to, but just be patient and make sure your blending is even on both sides.
Now we are going to start with the shadows.
STEP 7: Take your lip brush and dip into Candied Violets.

You're going to start at the edge of your line and gently blend up and out, leaving the baseline sharp and pristine. You'll start to see some of the softness and practicality of the look play in as your line is blended properly.


STEP 8: Clean off your lip brush and then dip into Strawberry Bon-Bon.

This shade goes directly under your cut-crease line. Use it to sharpen the line and lighten the crease.


STEP 9: Take your spongey applicator and dip into Marzipan.

You blend Marzipan from your lash line, almost to your crease, blend it together with Strawberry Bon-Bon, but leave the color pure at the crease line.

STEP 10: Back to Strawberry, you just want to layer a bit more at the crease line to be sure that you get that firm contrast.

STEP 11: Then we blend appropriately with a small blending brush.

Let's look at some progress. You should be right here with me.

STEP 12: Now you take your large blending brush and gather some Champagne Truffle onto it.

Blend down from your brow with the highlighter shade and soften up the edges of your crease line.

STEP 13: Back to the lip brush and get yourself ready for Haute Chocolate.

Blend at the corners of the eyes to about a third of the way across your lid.

See how it's shaping up?

STEP 14: Triple Fudge!

You're going to use this shade to close off your lid. Keep it in the corners and blend outwards.

STEP 15: Take your large blending brush and sweep up and out like the curve of your cheekbone. This adds to the mini face lift from earlier.

STEP 16: Time for the Gel liner and the angled brush. My go-to gel liner is MAC's Blacktrack. Get your brush covered enough to be able to do your wings.

Draw in your wings. You'll see that it closes up the brighter pops of color and isolates them to the lid, rather than being overwhelming and unwearable.

STEP 17: Mascara time! I don't think y'all need any instruction for that. Curl and apply-- I like UD Perversion and Too Faced Better Than Sex.

And lo and behold! An easy and wearable cut crease with colors!

Up close, you should have this.


I really hope you guys enjoyed my How-To. Please shoot me some feedback on whether videos are better, you like the text, you want both, etc... comment on FB, instagram, below, private messages, whatever you'd like. I can only please you guys so much without some feedback! But I hope y'all are rocking this fun, yet professional look! Put on a little lipstick of your choosing (don't forget to line your lips) and you are ready to go!
This is beautiful! Thank you for sharing!
ReplyDeleteLooks great.
ReplyDeleteGreat tutorial! Videos would be cool too. Just to actually see the application process.
ReplyDelete